Post List

2015년 9월 8일 화요일

Python GUI Programming : PyQt #01 Designer 사용 및 Signal/Slot

설치된 Program 목록에서 Qt Designer 를 선택하여 실행합니다.

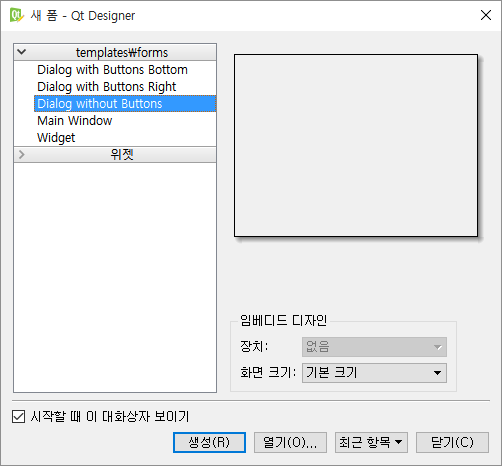
처음 뜨는 화면에서 Dialog without Buttons 를 선택하면 빈 Dialog 가 생성됩니다.


Toolbox 에서 Label, Button, LineEditor 등을 선택하여 화면의 모양과 같이 편집합니다.
Text 및 글자체 등은 속성 창에서 편집하면 됩니다.


Properties 창을 보시면 선택한 control에 따라서 항목이 바뀌는데,
기본적으로 QObject, QWidget 은 항상 표시되어있고,
control 마다 다르게 아래에 QDialog, QLineEditor 등이 나타납니다.

Properties 창 아래를 보면 Signal/ Slot Editor 가 있습니다.


+ 를 눌러서 항목을 하나 선택 한 후 위 그림과 같이 설정해줍니다.

LineEditor textChanged(QString)LablesetText(QString) 를 연결했다는 뜻입니다.
이게 어떤 의미인 지는 미리보기를 실행하면 알 수 있습니다.

이제 ctrl + R 을 눌러서 미리보기를 실행해 보겠습니다.


Designer 창에서 편집한 대로 Dialog가 실행되고 있는 것을 볼 수 있습니다.
이제 LineEditor 에서 text를 입력해 보겠습니다.


LineEditor에서 입력한대로 Label 의 글자가 바뀌는 것을 볼 수 있습니다.

Signal / Slot을 연결했기 때문에 두 control이 연계되는 것을 확인 할 수 있습니다.
아직 python code를 한 글자도 입력하지 않았는데도 말이죠.

그 동안 편집한 것을 저장하면 .ui 라는 확장자로 저장됩니다.
내부 data는 xml 형식입니다.

<?xml version="1.0" encoding="UTF-8"?>
<ui version="4.0">
<class>Dialog</class>
<widget class="QDialog" name="Dialog">
<property name="geometry">
<rect>
<x>0</x>
<y>0</y>
<width>400</width>
<height>300</height>
</rect>
</property>
<property name="windowTitle">
<string>Dialog</string>
</property>
<widget class="QLabel" name="label_out">
<property name="geometry">
<rect>
<x>50</x>
<y>30</y>
<width>301</width>
<height>51</height>
</rect>
</property>
<property name="font">
<font>
<family>맑은 고딕</family>
<pointsize>16</pointsize>
<weight>75</weight>
<bold>true</bold>
</font>
</property>
<property name="text">
<string>Hello PyQt</string>
</property>
<property name="alignment">
<set>Qt::AlignCenter</set>
</property>
</widget>
<widget class="QLineEdit" name="edit_in">
<property name="geometry">
<rect>
<x>20</x>
<y>210</y>
<width>361</width>
<height>20</height>
</rect>
</property>
</widget>
<widget class="QPushButton" name="btn_1">
<property name="geometry">
<rect>
<x>20</x>
<y>242</y>
<width>111</width>
<height>41</height>
</rect>
</property>
<property name="text">
<string>1st Button</string>
</property>
</widget>
<widget class="QPushButton" name="btn_2">
<property name="geometry">
<rect>
<x>150</x>
<y>240</y>
<width>101</width>
<height>41</height>
</rect>
</property>
<property name="text">
<string>2nd Button</string>
</property>
</widget>
<widget class="QPushButton" name="btn_3">
<property name="geometry">
<rect>
<x>280</x>
<y>240</y>
<width>101</width>
<height>41</height>
</rect>
</property>
<property name="text">
<string>3rd Button</string>
</property>
</widget>
</widget>
<resources/>
<connections>
<connection>
<sender>edit_in</sender>
<signal>textChanged(QString)</signal>
<receiver>label_out</receiver>
<slot>setText(QString)</slot>
<hints>
<hint type="sourcelabel">
<x>200</x>
<y>219</y>
</hint>
<hint type="destinationlabel">
<x>200</x>
<y>55</y>
</hint>
</hints>
</connection>
</connections>
</ui>
view raw HelloPyQt.xml hosted with ❤ by GitHub

댓글 없음:

댓글 쓰기